Do you own a recent television, TV box, CD player, games console or media player with a digital audio output, while your amplifier only has analogue RCA inputs? This is a very common problem. Modern devices increasingly speak “digital”, while many excellent Hi-Fi systems still expect an analogue signal.
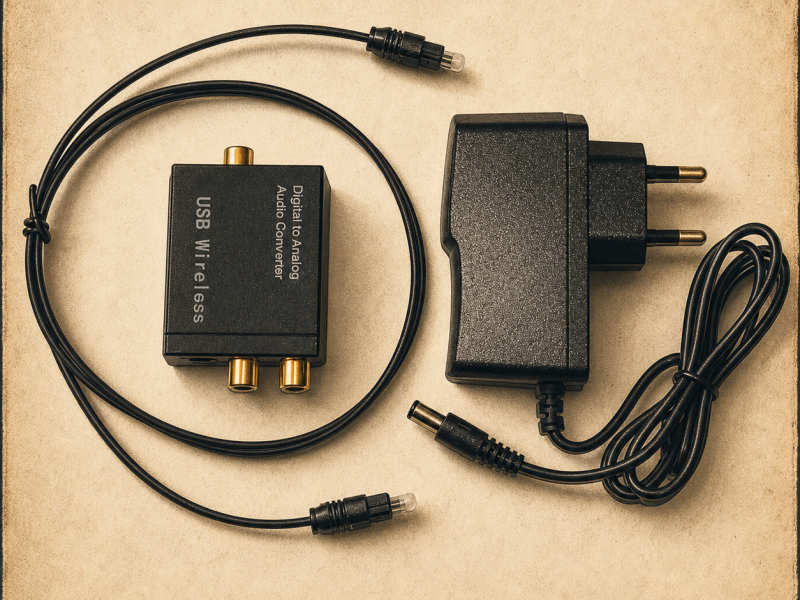
To solve this without replacing perfectly good equipment, Stereo's Store is adding a digital-to-analogue audio converter to its range. It accepts an optical Toslink or coaxial S/PDIF signal and converts it into stereo analogue audio through two RCA outputs. A mains power supply and Toslink optical cable are included for quick installation.
Your TV Is Modern. Your Hi-Fi System Is Better.
The little DAC that brings them together — no app, no account, and no need to send your amplifier back to school.
Once upon a time, a television had a headphone jack, RCA outputs, a SCART socket, and sometimes enough connectors to power half the living room.
Today it is connected, smart, ultra-thin, and capable of recommending a series you never asked to watch. Yet when you try to connect it to a good old stereo hi-fi system, it often stares back at you with its little square hole labelled “Optical Out.”
Your vintage amplifier, meanwhile, knows nothing about apps, updates, or user accounts. But it does know two essential things: the left channel and the right channel.
What they need is an interpreter.
The problem: your TV speaks digital, your amplifier speaks RCA
Many recent televisions no longer have analog RCA audio outputs, or even a 3.5 mm headphone jack. Instead, sound generally leaves the TV through a digital connection:
an optical Toslink output;
sometimes a coaxial S/PDIF digital output on an RCA socket;
or an HDMI ARC or eARC connection.
That is all very modern, but your amplifier from the 1970s, 1980s, or 1990s is patiently waiting for an analog stereo signal on its AUX, CD, TAPE, or LINE inputs.
That is exactly what a DAC, or digital-to-analog converter, is for: it receives the source’s digital audio signal and turns it into an analog stereo signal the amplifier can use.
In short, it translates the TV’s language without asking your amplifier to go back to school.
We were not looking for a machine loaded with screens, menus, apps, or features no one remembers after reading the manual.
We wanted a simple DAC designed to solve a simple problem:
Connect a modern digital audio source to analog stereo equipment.
This model has:
one optical Toslink digital input;
one coaxial S/PDIF digital input on an RCA socket;
two analog RCA outputs for the left and right channels;
an included 100–240 V mains adapter delivering 5 V DC;
an included Toslink optical cable.
It therefore works without having to put a computer next to the television just to get USB power. The stereo RCA cable connecting the DAC to the amplifier and the coaxial S/PDIF cable, however, are not included.
The idea is not to compete with an audiophile converter that costs as much as a small used car. The idea is to plug the box in, hear sound, and never be asked to create an account.
Practical example: connecting a recent TV to a vintage hi-fi system
Picture the scene. You come home with a brand-new television. The picture is superb. It recognizes your voice, your Wi-Fi network, and probably your sleeping habits.
You put on a music program. And then the sound comes from two tiny speakers trapped inside a screen only a few centimeters thick. The drums sound like cardboard. The bass seems to have stayed in the delivery truck. As for the voices, they sound as if they are coming from the next room.
Meanwhile, your vintage amplifier and two speakers are waiting three meters away. Here is how to put them back to work.
Connect the television to the DAC
Connect one end of the supplied Toslink cable to the television’s optical output. It may be labelled:
Optical Out;
Digital Audio Out;
S/PDIF Optical;
or simply appear as a small square connector that sometimes emits a red light.
Connect the other end to the DAC’s optical input.
Connect the DAC to the hi-fi system
Use a stereo RCA cable to connect the DAC’s left and right outputs to a line-level input on your amplifier: AUX, CD, TUNER, TAPE IN, or LINE IN.
Important: do not connect the DAC to the PHONO input. That input is designed for the very low-level signal from a turntable cartridge and applies special amplification and equalization that are unsuitable for a DAC’s output.
Connect the power supply
Connect the supplied power adapter to the DAC, then plug it into a wall socket.
No need for a running computer, a spare USB port, or a phone charger borrowed from someone who will inevitably start looking for it the moment you need it.
Select the correct inputs and outputs
On the television, choose the optical audio output or external audio device. On the amplifier, select the input to which the DAC is connected.
You should now get the voices, the instruments, the bass, the drums — and the strange feeling that your 1987 hi-fi system has just taught your 2026 television a lesson.
Menus vary by television brand, but you will generally need to select the optical output in the audio settings.
Everything is connected correctly, red light is travelling through the optical cable, and the amplifier is set to the right input… but there is no sound.
Before declaring a total system failure, open the television’s audio settings and look for an option such as:
Digital Audio Output Format;
Digital Output;
PCM;
Auto;
Pass-Through or Bitstream.
Try selecting PCM or stereo.
A basic stereo DAC is designed to receive a digital stereo audio signal. Some televisions may be configured to pass through a multichannel format intended for a home-theater system, which the converter may not be able to decode.
TV manufacturers generally offer several digital output formats and recommend choosing the one that matches the connected device.
This is its most obvious use. You keep your amplifier, your speakers, your stereo setup — and perhaps your acoustic dignity.
The television supplies the digital signal, the DAC converts it, and the amplifier does what it has known how to do for several decades: properly amplify music and voices.
A CD, DVD, or Blu-ray player with no analog output
Some recent players no longer offer stereo RCA outputs, but do have an optical or coaxial digital output. The DAC lets you connect them to a conventional analog amplifier.
Yes, we have reached an age when you may need to convert the digital signal from a CD player to listen to a disc on a hi-fi system designed specifically for listening to discs. Progress sometimes takes the scenic route.
A TV box or set-top box
An internet TV box, television receiver, or satellite box with an optical output can also feed the DAC.
This lets you enjoy your hi-fi system for films, concerts, music programs, documentaries — and televised debates, even if no improvement in sound can improve the content.
A game console
Some consoles or gaming setups can supply a digital audio signal through the television or another device with an S/PDIF output. The DAC then lets you use an analog amplifier and speakers for a fuller stereo sound than the screen can provide.
An old boombox or powered speakers
Have you kept an old AIWA, Philips, Sony, or Panasonic boombox with an auxiliary input? Or a pair of powered speakers with RCA inputs?
Provided the equipment has a compatible analog input, the DAC can bridge it to a modern digital source. Your old gear is not obsolete. It was simply waiting for an interpreter.
What about network streamers?
Most mainstream network streamers, including certain models from WiiM, Bluesound, Eversolo, and Cambridge Audio, already include their own DAC and analog RCA outputs. In that case, adding this converter usually achieves nothing: simply connect the streamer directly to the amplifier.
An external DAC can still be useful with a digital-only network transport — in other words, a device with no analog output.
In most setups, the television’s optical output level is fixed. You therefore control the volume directly on:
the amplifier;
the powered speakers;
or the analog device connected to the DAC.
This limitation depends on the television and its settings, but it is common with optical digital outputs. It means the TV remote will not always control the hi-fi system’s volume.
But let us be honest: your amplifier already had a perfectly good volume knob before remote controls came with forty-seven buttons.
For older listeners who refuse to throw away a good hi-fi… and younger ones who understand
This DAC is naturally aimed at anyone who owns a conventional analog hi-fi system and sees no serious reason to replace it with a soundbar.
But it may also interest younger listeners who are discovering that a real stereo amplifier and two properly spaced speakers can offer a far more convincing experience than a plastic tube placed under the television.
This is not about setting generations against one another. It is about helping two eras communicate when they simply no longer use the same sockets.
Can you connect a TV’s optical output to an amplifier with RCA inputs?
Yes, by using a digital-to-analog converter. The DAC receives the television’s Toslink optical signal and supplies an analog stereo signal through two RCA sockets.
Is the optical cable included?
Yes. This model comes with a Toslink optical cable and its mains power adapter. The stereo RCA cable connecting the DAC to the amplifier is not included.
Which amplifier input should I use for the DAC?
Use a line-level input: AUX, CD, TUNER, TAPE, or LINE. Do not use the PHONO input.
Why is there no sound after connecting everything?
Check that the television is using its optical output and try setting the digital output format to PCM or stereo.
Can I control the volume with the TV remote?
It depends on the television, but optical outputs often provide a fixed level. In that case, adjust the volume on the amplifier or powered speakers.